UPDATE: After initial excitement about xUnit, I needed to deal with some specifics. And now I don’t advise to move ALL your tests to xUnit. I’d recommend go into that slow and read through my rant here, before you commit to converting.
Nunit is a great testing framework. Only it is a little old now and new testing approaches are no longer fit into Nunit concepts. I’m talking about using Autofixture for generating test data. So I decided to see how xUnit will pan out for our projects and should we convert all our tests into xUnit or not.
Benefits of xUnit over NUnit are simple for me: AutoData attribute from Autofixture does not play nicely with NUnit due to architectural wirings. There are ways to have Autodata for
Nunit, but this does not work nicely with Resharper 8.1 and NCrunch.
Also I decided to move away from Moq mocking framework and give a go to NSubstitute. I love Moq framework – it is simple, flexible enough and easy to learn. But if you churn out tests at any rate per hour, you are sick of typing Mock<IServiceName>() every time. And if you use Autofixture, then you have to type fixture.Create<Mock<IService>>() – a bit of mouthful. Amount of times I’ve forgotten to put Mock<> as part of generic type is infinite. This simply gets annoying.
NSubstitute allows you to create mocks without specifically saying Mock<>. And this shortens your tests and reduces scope for error.
I’ve made an experiment and compared exactly the same test in NUnit/Moq vs. xUnit/NSubstitute. Nunit test was 17 lines of code with setup, xUnit with Data Theory was 8. See this gist for old style. And check out the shortness of new approach. The tests are from production and both test exactly the same thing. Only second one takes almost half the size and time to write.
Convert Your Projects
In this blog-post I’ll talk through of adding xUnit to a project. I’m writing this as I’m converting one of my projects from NUnit/Moq to xUnit/NSubstitute.
First of all you’ll need new Nuget packages:
AutoFixture.XunitAutoFixture.AutoNSubstitute
These 2 will install for you xUnit, xUnit.Extensions, NSubstitute as dependencies. Then you’ll need to update NSubstitute to a latest, because as a dependency it does not give you a latest version.
Then you’ll need to create AutoData attribute for xUnit tests. Because I have a lot of tests (in this project I have 250+ tests) on NUnit with Moq, I still need to cater for old tests, because I’m not planning to convert them to xUnit at once. So I’ll need to make sure xUnit and NUnit tests work along side each other. First you’ll need to create classes for xUnit to work with Autofixture:
using NSubstitute;
using Ploeh.AutoFixture;
using Ploeh.AutoFixture.AutoNSubstitute;
using Ploeh.AutoFixture.Xunit;

// This one is to be used with DataTheory attributes
public class AutoDomainDataAttribute : AutoDataAttribute
{
    public AutoDomainDataAttribute()
        : base(new Fixture().Customize(new XunitCustomisation()))
    {
    }
}


public class XunitCustomisation : ICustomization
{
    public void Customize(IFixture fixture)
    {
        fixture.Customize(new DomainCustomisation());

        fixture.Customize(new AutoNSubstituteCustomization());
    }
}
I separate Domain Customisations from mocking, because I also have this:
using Ploeh.AutoFixture;
using Ploeh.AutoFixture.AutoMoq;


public class DomainMoqCustomization : ICustomization
{
    public void Customize(IFixture fixture)
    {
        fixture.Customize(new DomainCustomisation());

        // use Moq for stuff that has interfaces
        fixture.Customize(new AutoMoqCustomization());

    }
}
This allows to have same Domain customisations, but with different mocking frameworks. Code reuse! And DomainCustomisation class looks like this:
public class DomainCustomisation : ICustomization
{
    public void Customize(IFixture fixture)
    {
        // ignore circular dependencies
        fixture.Behaviors.Remove(new ThrowingRecursionBehavior());
        fixture.Behaviors.Add(new OmitOnRecursionBehavior());

        // if object has Start and End properties, start will be assigned as RandomPastDate() and
        // end will be assigned as RandomFutureDate()
        fixture.Customizations.Add(new StartEndDateSpecimenBuilder());

        // ignore all Virtual properties on complex objects.
        //See here http://stackoverflow.com/a/15707393/809357
        fixture.Customize(new IgnoreVirtualMembersCustomisation());

        fixture.Inject<ILoggingService>(new TraceLogger());
    }
}
So old tests still use fixture = new Fixture().Customize(new DomainMoqCustomization()). Where new ones will involve xUnit and NSubstitute.
Now you are ready to write your first test in xUnit. I’ve picked a simple test from nUnit and converted from this:
[SetUp]
public void SetUp()
{
    fixture = new Fixture().Customize(new DomainMoqCustomization());
}

[Test]
public void MakeJobFromCommand_Always_MatchesFields()
{
    //Arrange
    var sut = fixture.Create<CreateJobCommandHandler>();
    var command = fixture.Create<CreateJobCommand>();

    // Act
    var result = sut.MakeJobFromCommand(command);

    // Assert
    AssertionHelpers.PropertiesAreEqual(command, result, "RoleOther", "RoleId", "AdminComments");
}
To this:
[Theory, AutoDomainData]
public void MakeJobFromCommand_Always_MatchesFields(CreateJobCommandHandler sut, CreateJobCommand command)
{
    // Act
    var result = sut.MakeJobFromCommand(command);

    // Assert
    AssertionHelpers.PropertiesAreEqual(command, result, "RoleOther", "RoleId", "AdminComments");
}
This basically removes all of the Arrange stage. Making the test half the size.
Please be careful with reference of Theory attribute. Both NUnit and xUnit have this attribute, so many times you need to specifically mention xUnit.Theory for things to work.
Binding Redirect
You may have noticed that I’ve advised to update NSubstitute to a latest version. And if you run the test above, you’ll get an exception:
System.IO.FileLoadException: Could not load file or assembly 'NSubstitute, Version=1.4.3.0, Culture=neutral, PublicKeyToken=92dd2e9066daa5ca' or one of its dependencies.
That is because Autofixture is build against older version of NSubstitute. To fix this problem open nuget console (in VS View -> Other Windows -> Package Manager Console) and run this command:
Add-BindingRedirect -ProjectName MyApp.Tests
Where MyApp.Tests is a project name for your test project. Or you can select Default project from the top of the console. This should modify your app.config file and add appropriate binding redirection for runtime that looks like this:
  <dependentAssembly>
    <assemblyIdentity name="NSubstitute" publicKeyToken="92dd2e9066daa5ca" culture="neutral" />
    <bindingRedirect oldVersion="0.0.0.0-1.7.1.0" newVersion="1.7.1.0" />
  </dependentAssembly>
IDE test runners
I’m using NCrunch for running my tests in Visual Studio. NCrunch has no problems with xUnit – supports out of the box.
If you are using Resharper 8.x there is an add-on for running and recognising xUnit tests. Go to Reshrper menu -> Extensions Manager; Find and install extension “xUnit.Net Test Support”. Restart VS and you’ll good to run your new tests in R#. I’m not sure how to do this in R#7, you’ll have to google yourself -)
Visual Studio also has a plugin to run xUnit in inbuild test runner. Go to Tools -> Extensions and Updates; Search and install for “xUnit Runner”. Again, restart VS to make it work. Or download it from Codeplex
Build Server
Next step is to get xUnit tests to be executed on your Build Server. We are using TeamCity, so I’ll talk about it just now. My other project is built on hosted TFS service http://tfs.visualstudio.com/ and make xUnit run on that beast will be a topic of my next blog post.
xUnit has inbuilt support for TeamCity – you don’t have to do anything special, only create .msbuild file to execute your tests and xUnit will check the environment and will output the result in format that TeamCity can understand.
To make xUnit run through msbuild you’ll need test-runner assembiles. And you already have the assemblies! Did you install xunit nuget package? Well, everything you need is already inside the package. Head to /packages/xUnit/**/ folder and find these files:
- xunit.dll
- xunit.runner.msbuild.dll
- xunit.runner.tdnet.dll
- xunit.runner.utility.dll
I like to have assemblies used for build process separately and have .build folder in solution. So I copied these files to .build/xunit. You might want to use the files from packages folder, but I don’t trust Nuget on this part.
My build script is on MsBuild, so in that file I’ve added another target that looks like this:
<UsingTask AssemblyFile="$(MSBuildProjectDirectory)\.build\xUnit\xunit.runner.msbuild.dll" TaskName="Xunit.Runner.MSBuild.xunit"/>
<Target Name="xUnitTests">
    <xunit Assembly="$(MSBuildProjectDirectory)\Tests\MyApp.Tests\bin\Debug\MyApp.Tests.dll" />
</Target>
You’ll need to point Assembly property from xunit element to your assembly(s) with tests. And that should do it. Now check in, don’t forget to check-in xunit assemblies in .build folder and changes to your build script.
After you’ve checked in, new build script is available on Build Server and you can add another step to your TeamCity build configuration:
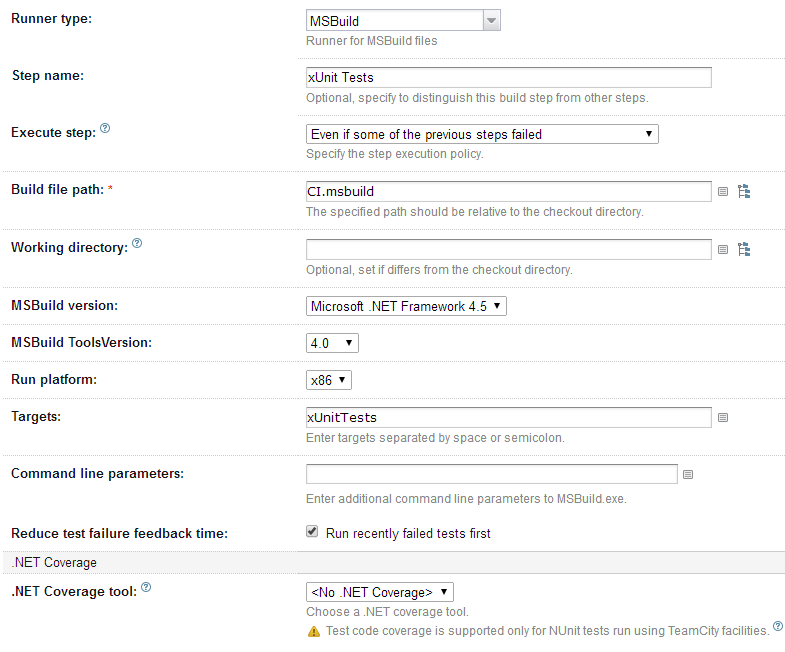
If everything went fine, you should see your xUnit tests running in TeamCity.