First time I have tried TFS Build feature a few years ago and that was on hosted TFS 2010 version. And I hated it. It all was confusing XML, to change a build template I had to create a Visual Studio Project. I barely managed to get NUnit tests to run, but could not do any other steps I needed. So I abandoned it. Overall I have spent about 3 days on TFS. Then I installed Team City and got the same result in about 3 hours. That is how good TeamCity was and how poor was TFS Build.
These days I’m looking for ways to remove all on-prem servers, including Source Control and Build server. (Yep, it is 2016 and some companies still host version control in house)
Visual Studio Team Services Build – now with NuGet feed
Recently I’ve been playing with Visual Studio Team Services Build (used to be Visual Studio Online). This is a hosted TFS server, provided by Microsoft. Good thing about it – it is free for teams under 5 people. At the end of 2015 Microsoft announced a new Package Management service. So I decided to take it for a spin. So today I’ll be talking about my experience with VSTS build, combined with Package Management.
Disclaimer
I’m not associated with Microsoft, nor paid for this post (that’s a shame!). All opinions are mine.
VSTS is moving fast with new features popping up every other week. So information in this post might become out-of date. Please leave a comment if things don’t work for you as expected here.
C# package in private NuGet feed
Today I actually need to create a C# library for internal use and publish it to a private NuGet feed. So I’ll write down my steps for future generations.
For the purposes of this guide, I presume you already have VSTS project and have some code in it. You also know what CI is and why you need a build server.
Set up Build Definition
Now navigate to Build page. It’ll look something like this:
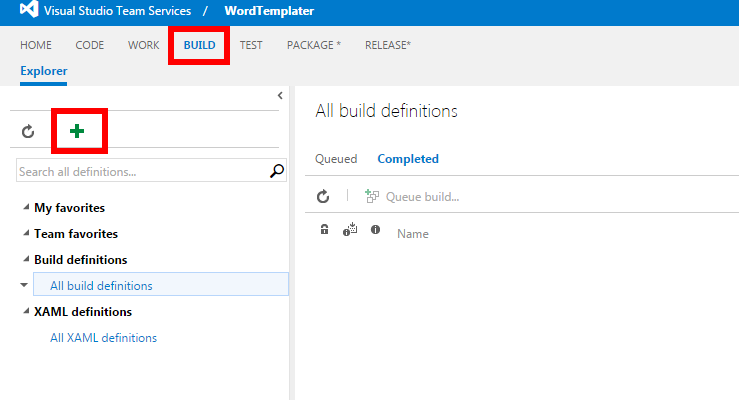
Hit green plus sign to create a new build definition. You’ll be presented with a template selection. For purposes of my project “Visual Studio” template is good enough. But you can choose “Empty” build definition and build up as you go. Then you’ll be asked about source control – I’m using VSTS Git repository, so I’m offered all correct settings by default. I believe you can hook Github, other external Git and external SVN into this, but I never tried.
After the build definition is created you should see something like this:
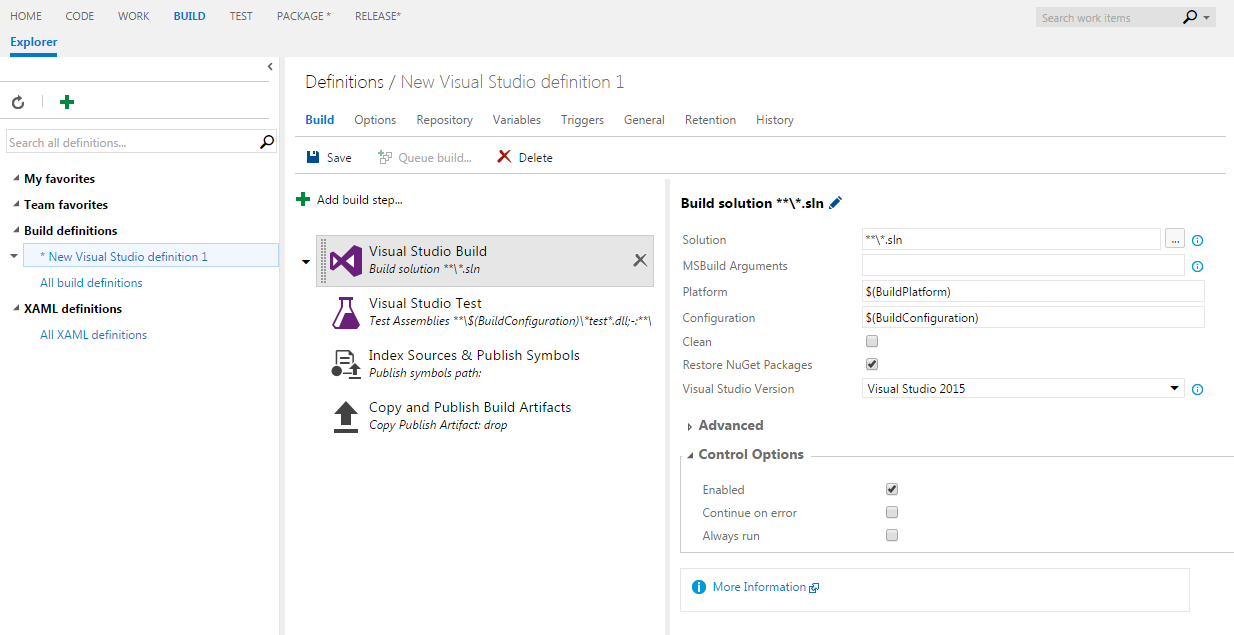
For just now I’ll disable all steps apart from the first. We’ll work our way through them as we go.
Build Version
Because I’m doing a library package, even for internal use I would like a proper version numbers stamped in assemblies and NuGet. So I need to set up version numbers first.
By default VSTS has a strange version numbers which I don’t like. So I followed this blog-post from InCycle Software.
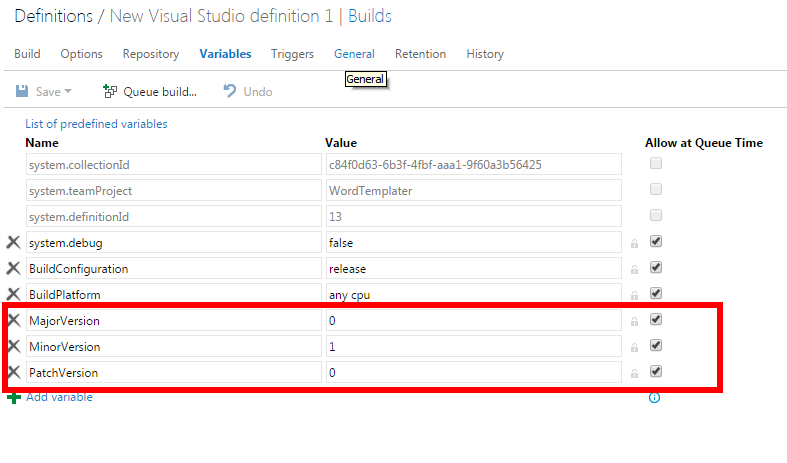
I have modified the steps, so I’ll describe them here: go to Variables tab in build definition and add MajorVersion, MinorVersion and PatchVersion variables – to follow semantic versioning.
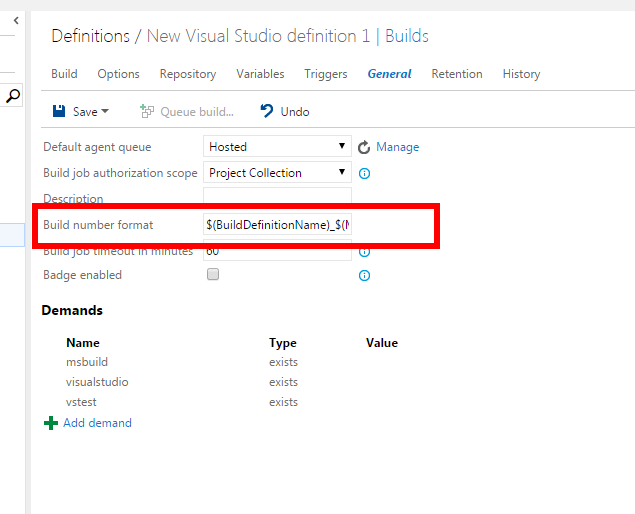
Then go to General tab and change Build number format to be $(BuildDefinitionName)_$(MajorVersion).$(MinorVersion).$(PatchVersion)-$(Year:yy)$(DayOfYear)$(Rev:rr)
Build number is up for a debate. I’m not a fan of appending year, day of year and revision to the version number, but that seems the most optimal for me just now. In TFS/SVN world my first choice would be to append latest commit number as the last digit of the build number, but this [does not exist in Git](http://stackoverflow.com/questions/4120001/what-is-the-git- equivalent-for-revision-number).
Note that suffix is separated by a dash, not a dot. According to semver, this is an extension to the build number. This will not be part of a .Net assembly stamp.
The above format for build number will make the following result:
Build & Test_0.1.0-1602401
Bear in mind that build number (or name) is not the same as an assembly version stamp. This is a next step.
Update Version Numbers in assemblies
Now I need to extract actual version number (in my current case this will be 0.1.0) from the build number and then update AssemblyInfo.cs file in the project.
To do this you can add a powershell script to your version control (I have build folder for this stuff) that does it – just follow this sample. The script there worked for me on my previous project, so you can just copy-paste it and use their directions.
Though I’ve found a build step on marketplace that does just the same: Colin’s ALM Corner Build & Release Tools. This extension contains a few steps, including Version Assemblies. You can review the source code for this step on GitHub.
I’ve added this step to the build definition. It looks like this:
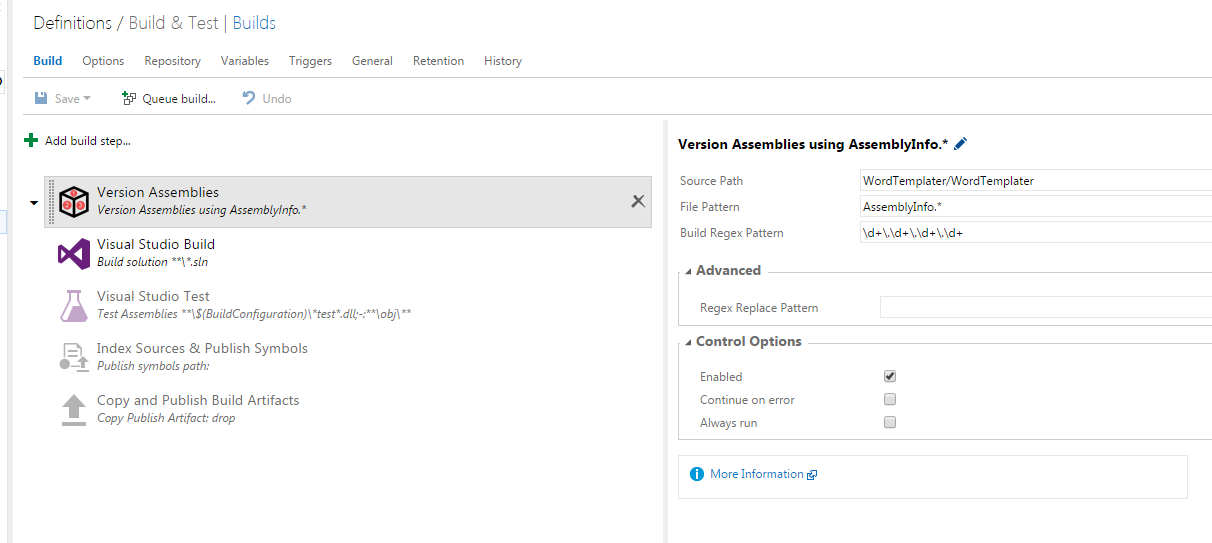
“Source Path” is self explanatory – where to search for AssemblyInfo.cs files
“File Pattern” is also pretty clear “Build Regex Pattern” is a bit more interesting – this is the regex applied to the build number (at the moment we have this as Build & Test_0.1.0-1602401 – see above). “Regex Replace Pattern” – this sits inside of Advanced section.
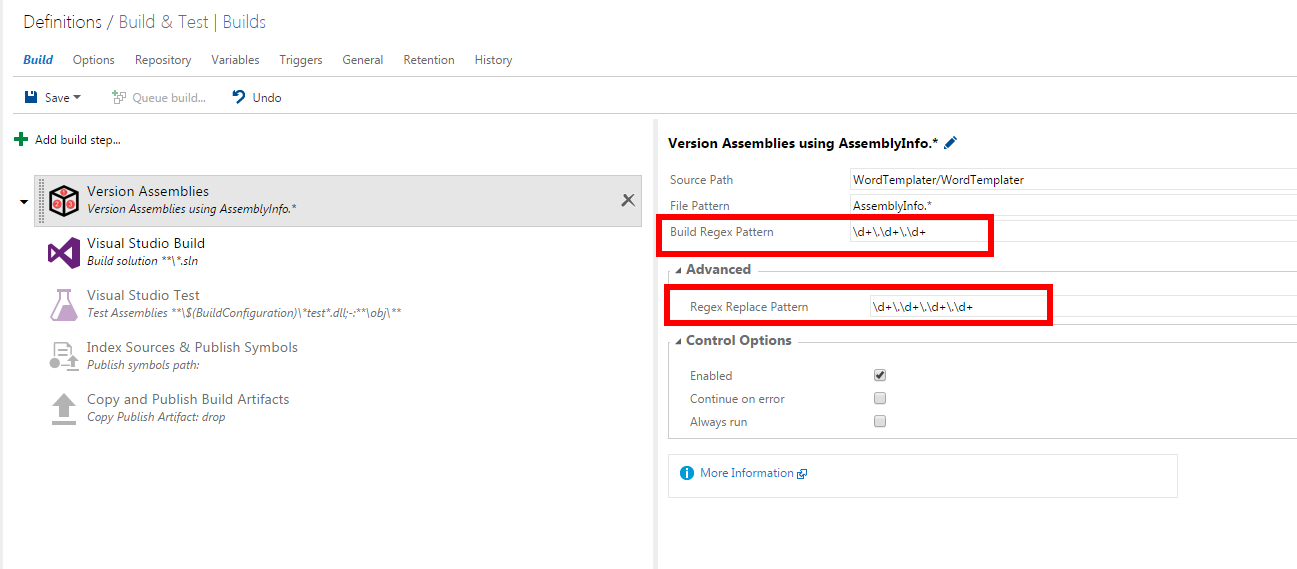
If you run the build just now, this step will not do anything because default regex of \d+\.\d+\.\d+\.\d+ does not match Build & Test_0.1.0-1602401 – we only have 3 digits for version number and a suffix. So we need to update the regex to match 3 digits: \d+\.\d+\.\d+. But default assembly version annotation in .Net projects look like this: [assembly: AssemblyVersion("1.0.0.0")] there are 4 digits. So we need to provide a replacing regex that will match 4 digits: \d+\.\d+\.\d+\.\d+.
This step should look like:
At this stage your build should get you a version number stamped into your assemblies and the project built. Next are tests.
Running Unit Tests
I have used NUnit in another project that is built in VSTS and experience from buld point of view was pretty good – all my tests got executed without effort. For this project I’ll give it a go with xUnit.Net.
I’ve installed xUnit.Net NuGet package in the test project, created a basic test and checked-in. And no tests got executed. Apparently I need to install test runner as a NuGet package into the project: xunit.runner.visualstudio. After that I re-run the build and I had my failing test failing the build, meaning the tests are executed. Happy days – no configuration changes, no struggle. Pretty good!
Packing as NuGet
Next on my list of steps is to package my assembly into a NuGet. This step actually took me a while to figure out correctly. So you better listen!
There is an easy option not to create nuspec file, but I would like to provide a description, urls and include additional files. So I created MyProject.nuspec file next to MyProject.csproj file. Contents of this file is as following:
<?xml version="1.0"?>
<package >
  <metadata>
    <id>MyProjectName</id>
    <version>$version$</version>
    <title>My Project Name</title>
    <authors>Max Vasilyev</authors>
    <owners>Max Vasilyev</owners>
    <licenseUrl>http://tech.trailmax.info</licenseUrl>
    <projectUrl>http://tech.trailmax.info</projectUrl>
    <requireLicenseAcceptance>false</requireLicenseAcceptance>
    <description>Some description of the project</description>
    <releaseNotes></releaseNotes>
    <copyright>Copyright 2016</copyright>
  </metadata>
  <files>
    <file src="bin\Release\MyProjectName.pdb" target="lib/net452"/>
  </files>
</package>
See line with <version>$version$</version> – I include `$version$ token in the nuspec. This is important. Don’t leave this blank, it wouldn’t work.
Then add “NuGet Packager” step to the build definition:
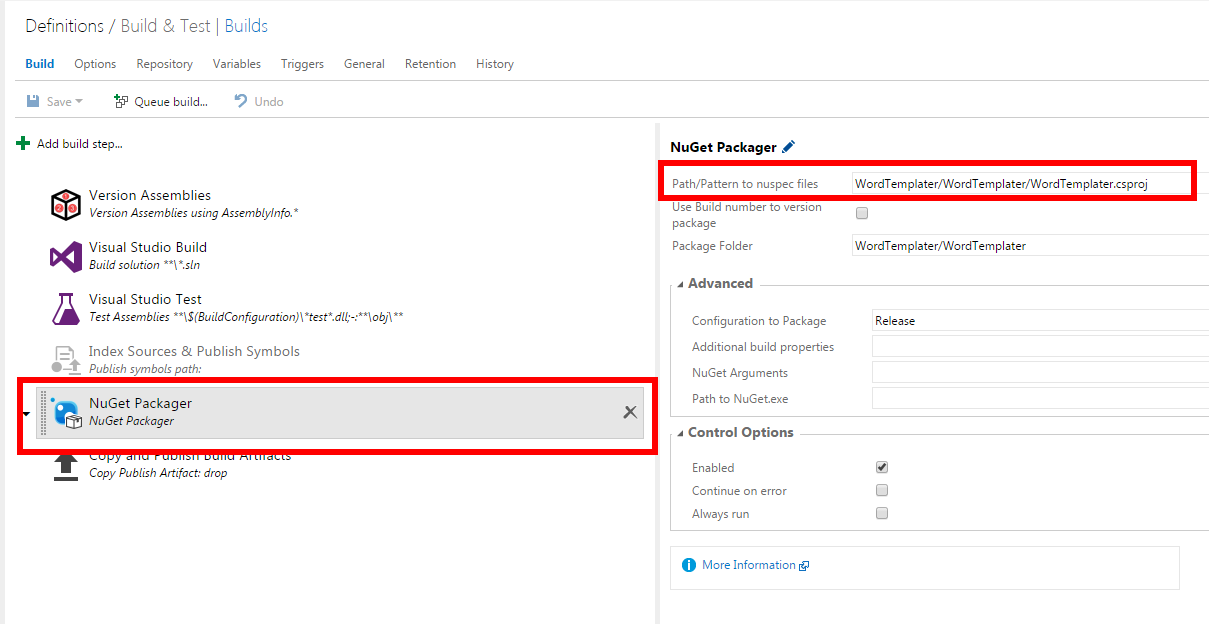
This step goes after tests. Point Path/Pattern to nuspec files field at your csproj file, not on nuspec. This way version will be picked up from AssemblyInfo.cs file, but the rest of metadata from nuspec file. This took me a while to figure out. Because I was trying to use nuspec directly and trying to provide -Version=$(MajorVersion).$(MinorVersion).$(PatchVersion) but build server had none of it. I’ve tried a pile of different combinations and did not manage to produce the desired outcome. Maybe guys from Microsoft can provide some guidance how to do this in the documentation, because just now NuGetPackager documentation page looks bare:

Publish Artifacts
Publishing artifacts was also not easy – my nupkg file was created but not copied. So this step can also be finicky.
Enable (or add if you are going from empty template) step called “Copy and Publish Build Artifacts”. If you are adding, make sure you don’t use step called “Publish Build Artifacts” – this is a different step and won’t work for our purposes.
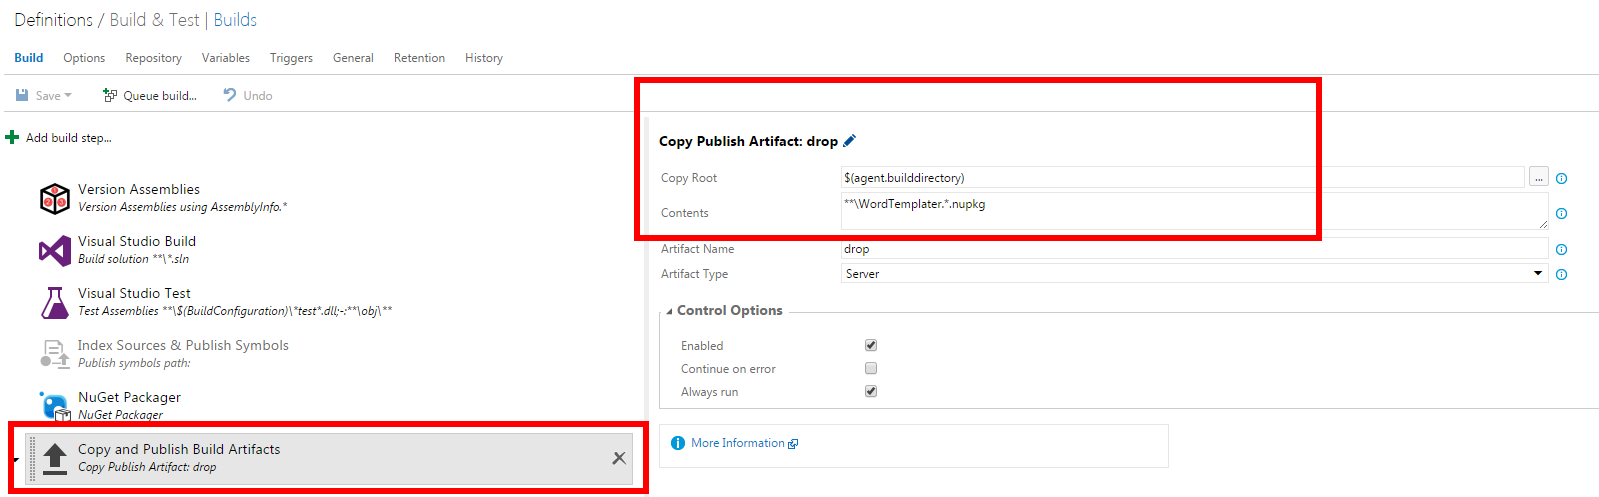
Make sure your “Copy Root” field says $(agent.builddirectory) – I could not make the build step to pick up the generated nupkg file otherwise. This was because NuGet Packager step was saving nupkg file into folder outside source directory. But for a change documentation for this step was more useful.
“Contents” field should be something like **\MyProjectName.*.nupkg. First I have used **\*.nupkg but this picked up NuGet packages that were in pacakges folder that I have consumed as dependencies.
These folders are absolutely not the best defaults, but these work for me just now and my project is very basic (think of Hello-World.nupkg)
If you get this step right, you’ll get a new tab available when the build is finished running: Artifacts. In that tab you can view or download your generated artifacts. This is how it looks for me just now:
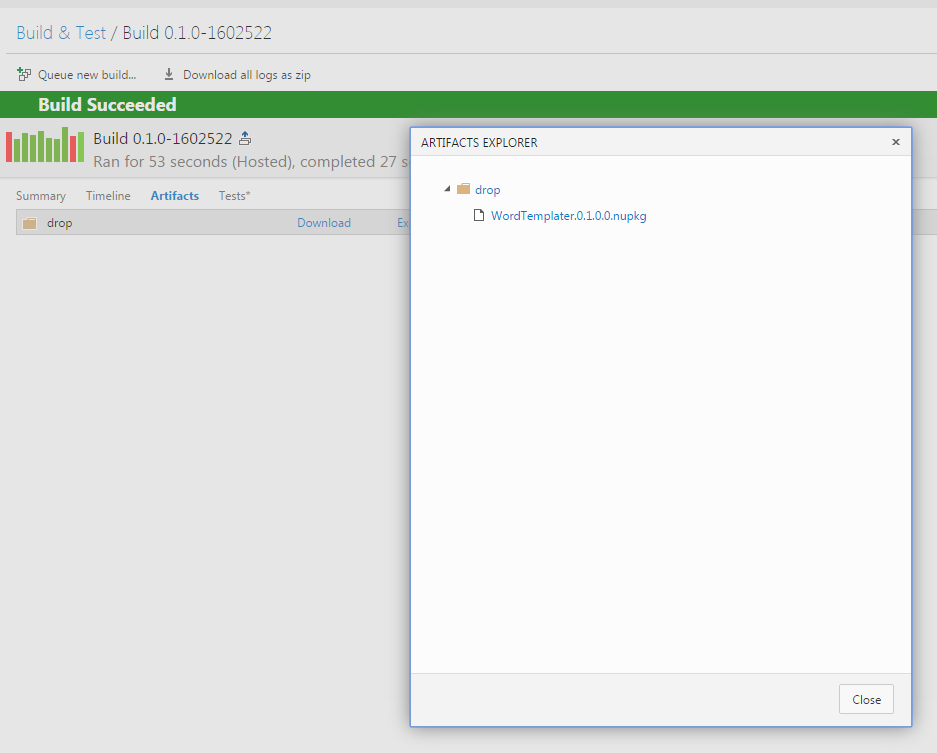
Please note – this important: you only need to publish the artifacts only if you are going to use the Release Management (see below). If you want to publish every package generated, you can add NuGet Publisher step into your build template. But for the sake of exploring, I’ll use Release Management and will publish only selected packages.
Release
Create NuGet Feed
First you need to enable Package Management feature in VSTS marketplace. So go to Package Management page and hit Install. At the moment (23 Jan 2016) this feature is in preview and a note saying “this is only available in US region only”. But I’m in UK and I’m using it – there is a chance that this feature will work for you.
Update (28 Jan 2016) Microsoft team says that my account must be in US data-centre – hence I can access it. Also they say “We’re enabling European and Australian customers hopefully by end of next week”.
Once this is done, you need to navigate to your project in VSTS then find “Package” link on the top menu bar:

This will bring you to feeds management. Go create a new feed (“New Feed” button on top left):
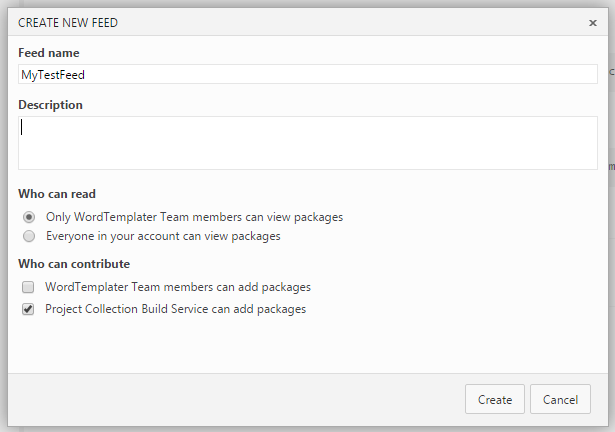
Select required level of access (can be changed later) and hit Create.
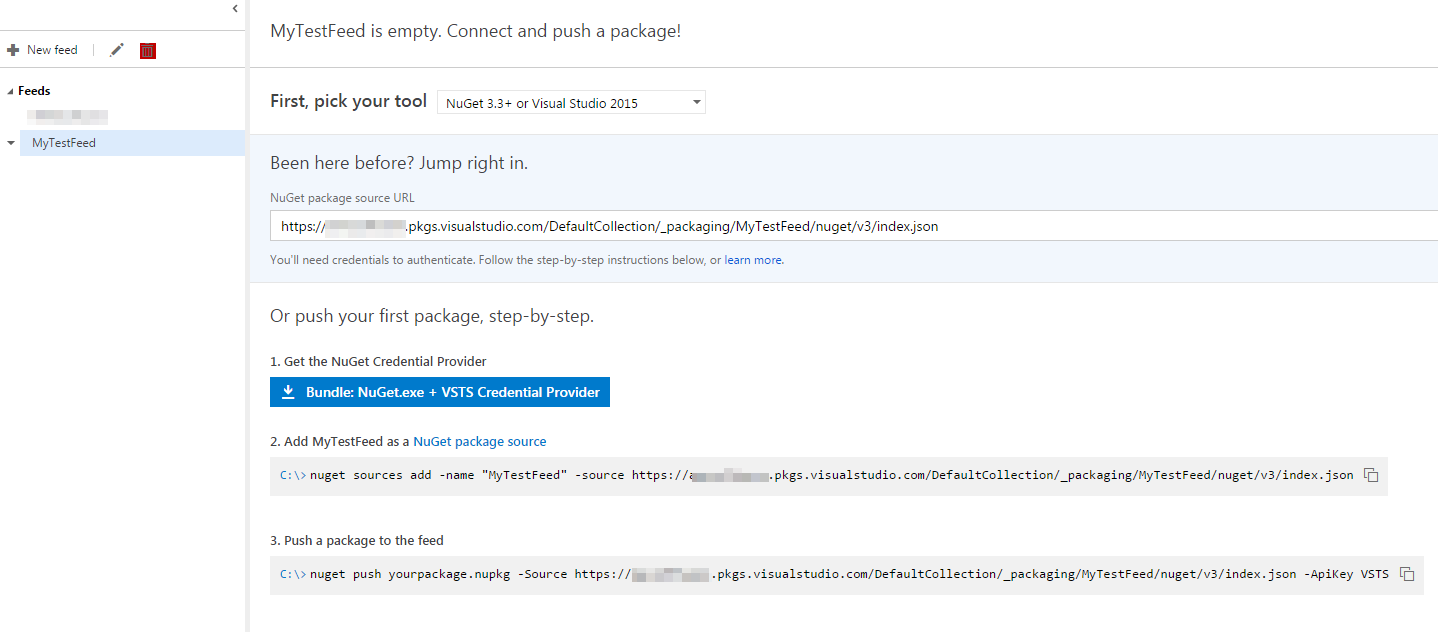
Created NuGet feed will look like this:
Publish NuGet
At this stage we have a few steps configured – stamping version number, building the project, running tests, packing assemblies into NuGet package and publish this NuGet as an artifact. Next logical step is to publish this NuGet into a NuGet feed and consume. But you don’t want a result of every build to be published into a NuGet feed. And possibly you would like some more ceremony about packages that go for a release.
For these purposes VSTS has Relase Managmenet tab – that is still in preview at the moment, but I’m playing with it. So my plan for release is to take generated nupkg file and put on a NuGet feed that we have created at the very start of this article.
In you VSTS project click on Release menu item on the top bar and add a new Release definition:
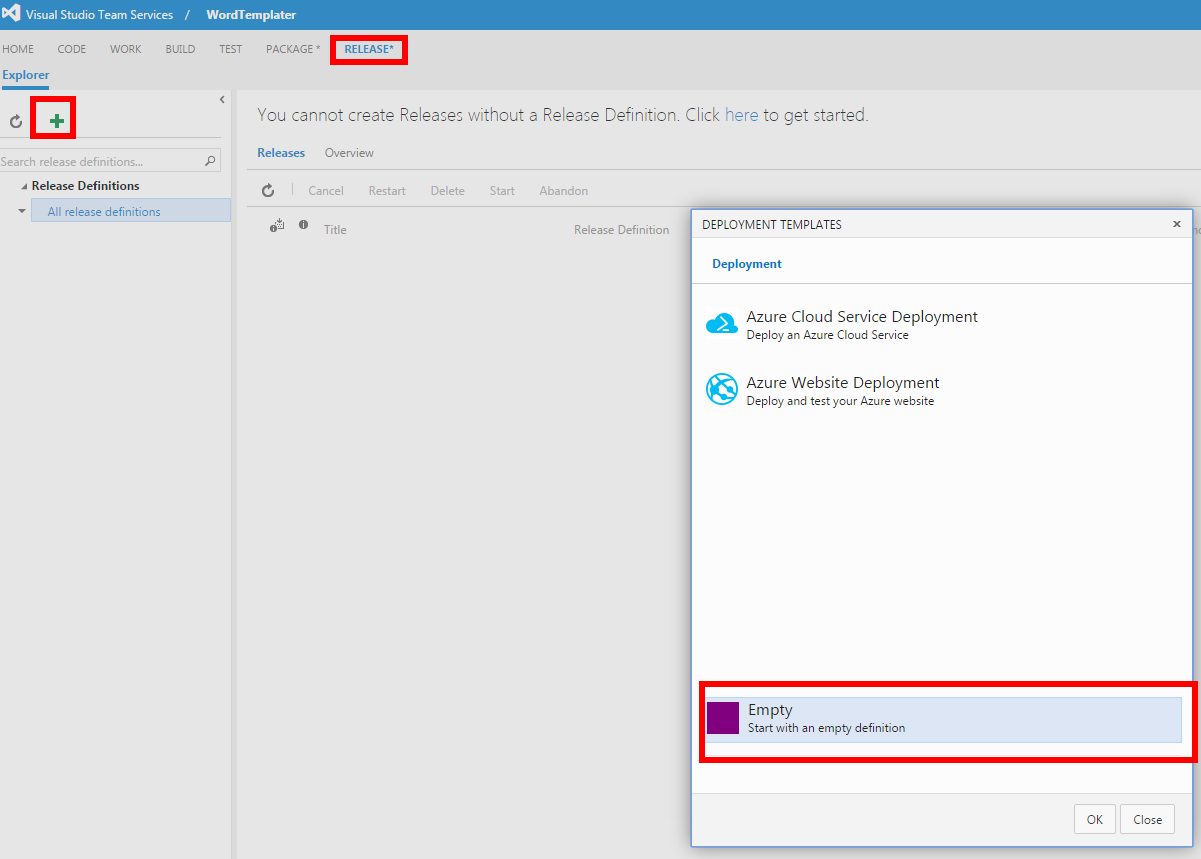
Pick an empty definition, because other templates do not fit for our purposes. Give this release a name and link to a build definition:
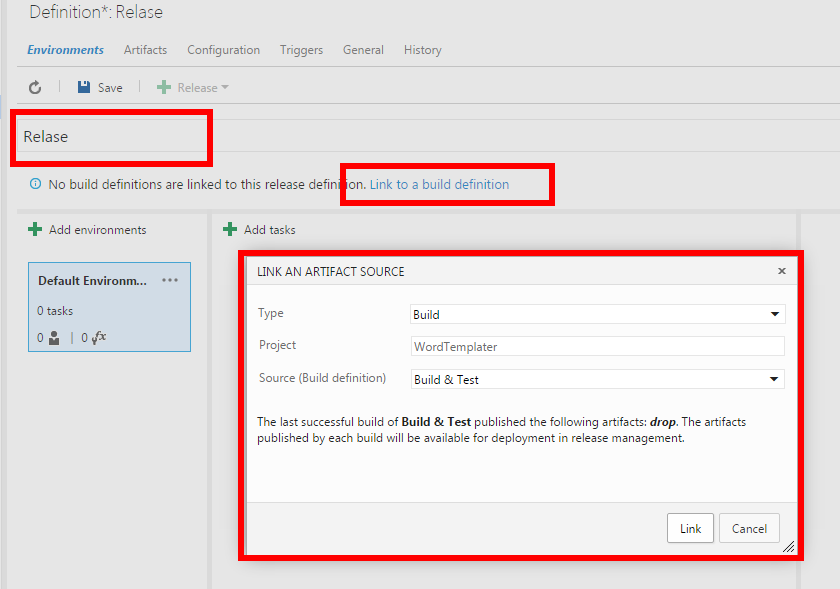
Release consists of Environments and Tasks. Tasks are the same as parts of build, but aimed at deploying your software somewhere – an Environment. Environments can be Dev, Testing, QA, Production, etc. These are servers where you deploy your project. VSTS Environments differ from each other with variables and permissions. Because I only need to publish already existing package to a NuGet feed, I need only one environment. But for more complex workflows you might want to have different environments that publish packages to different feeds: i.e. pre-releases to myget.com, production releases to NuGet.org and environments would contain credentials to different feeds, but tasks would remain the same.
When you create a release, a Default Environment is created – I’ll use it. And I’ll add “NuGet Publisher” task:
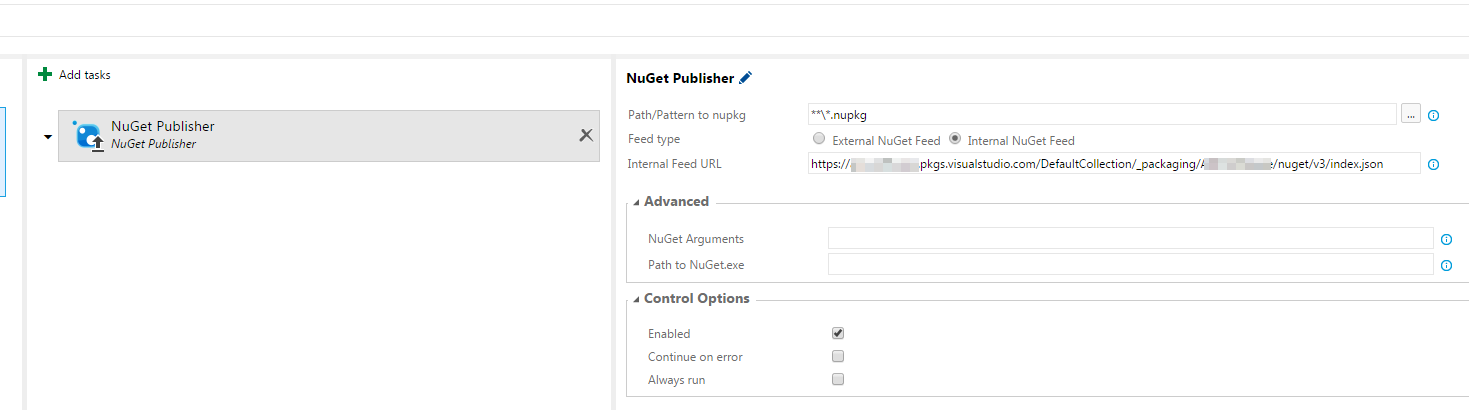
For “Internal Feed URL” copy NuGet Package source URL from the feed we have just created. Make sure you choose “Visual Studio 2015” to get v3 url.
And we are done here now. Next step is to trigger a build. Build will create a NuGet package and publish as an artifact. Once you would like to make a release – go into releases section and create a new release. This will publish your NuGet into your private NuGet feed.
Conculsions
VSTS Build/Release/Packaging is a great service and a great candidate for a hosted build server that can replace TeamCity/Octopus Deploy combination. And my next project will be build/deployed via the process described above.
I was surprised how easy it was to configure NuGet feed. Though publishing a NuGet to a feed from Release had a bug and I had to wait couple weeks for the fix to be deployed. But the issue was already fixed by the time I came across it, it only had to be deployed. I had a great communication with VSTS team Donovan Brown and Matt Cooper (thanks, guys!). This post been ready for a while, only waiting for the fix to be deployed -)
Another nice surprise was with tests. Running xUnit.Net tests in VSTS was super-easy. Comparing to my on-prem TFS 2010 Build experience, getting tests to run was effortless. Extra Kudos points for this!
Possible Improvements
However good the build service is, I still had issues. First issue was with the versioning. Default build number format does not match semantic versioning. That’s OK. But adding year/day number as part of the version is a bit iffy. I have tried adding $(Build.SourceVersion) as part of the version – this is supposed to be a version control change number or a hash in case of Git. But I only got an empty space. So my versioning strategy remains open for discussion and improvement. Also I have not found a variable that contains total number of bulids executed since the start of the project – this was my other candidate for the last digit of a version.
Another problem I had was with providing a version number to the NuGet packager. I have tried adding various flavours of argument -version=$(MajorVersion).$(MinorVersion).$(PatchVersion), but nothing I tried worked. The only way I found was to stamp the version into an assembly, then build NuGet based on *.csproj file that scans assemblies for information and provide additional information in nuspec file. That was cumbersome. I wish there was easier way to provide a version to NuGet packager. Or at least documentation stating how to do it – I’m clearly missing something minor here.
And the last statement – I’m not entirely sure if this workflow is the best way to do what I need to do, but it currently work for my project I’m piloting VSTS with. Ask me 6 months down the line if the steps have changed significantly and then we can decide if this is a good workflow.
Update – 28 Jan 2016 I had Matt Cooper replying to this post on behalf of Microsoft:
- Missing docs for the tasks. That’s our fault, sorry. The NuGet tasks originally came from the community, and when my team took them over, we didn’t add docs. It’s on my radar to fix.
- Overly aggressive matching pattern in the NuGet Publish step (**\*.nupkg) – we have a fix pending for that this sprint.
- I’m hearing a lot about how hard versioning is. That will be a focus over the next few months, though I don’t have anything concrete to share right now. Sorry for the trouble at the moment.
References: